
What Is a Heat Sink? How It Works, Types, Components & Practical CPU Cooling Tips
People ask what is a heat sink only after their CPU starts overheating and slowing down. The truth is simple. A heat sink handles CPU cooling by moving heat away from the chip and pushing it into the air. Without it, heat builds up fast and causes performance drops, noise, and even system crashes.
So yeah, understanding heat dissipation and thermal management actually saves you from a lot of problems later. In this guide, I’ll walk through how a heat sink works, the different types, key parts, and simple ways to fix or test cooling issues. Nothing complex. Just what actually works in real setups.
Key Takeaways
- A heat sink pulls heat away from a CPU or chip and pushes it into the air for cooling.
- Heat moves in two steps. First into the metal, then out into the air through airflow.
- You get three main types. Passive, active, and hybrid. Each fits different cooling needs.
- Good contact matters a lot. Thermal paste or a pad helps move heat better from CPU to heat sink.
- Aluminum and copper change how fast heat moves, plus weight and cost. Fin shape also affects cooling.
- You can check CPU cooling with simple tools and stress tests to see real heat levels.
- Most overheating comes from dust, bad airflow, broken fans, or poor thermal paste setup.
What Is a Heat Sink? (Simple Definition + Where You See It)
People confuse this a lot, so here’s the simple way I look at it. A heat sink is a metal block that sits on top of a computer chip and pulls heat away from it. The chip, like a CPU, gets hot when it works. The heat sink takes that heat and spreads it out using its fins so air can carry it away. That’s how heat dissipation and thermal management happen in a basic setup.
On a CPU, the heat sink usually sits right on top with thermal paste in between. And most of the time, there’s a fan attached to help move air through the fins faster. You’ll also find heat sinks on GPUs, power supplies, and even inside gaming consoles. Some small devices use fanless heat sinks, while bigger systems use fans or even liquid cooling along with them.
So yeah, the job is simple. Move heat away from the computer chip before it gets too hot and slows things down.
Why a Heat Sink Matters for Performance and Reliability
A CPU starts overheating, and suddenly the system slows down or fans get loud. A heat sink fixes this by moving heat away from the chip before it builds up. The fins add more surface area, so more heat can escape into the air through convection. And yeah, good contact matters. A thermal conductor like thermal paste helps heat move faster from the CPU into the heat sink.
This becomes even more important in small spaces. Laptops and compact PCs don’t have much airflow, so heat builds up faster. When cooling is weak, you may notice lag, stuttering, or sudden drops in speed. That’s not random. That’s heat affecting performance. In setups like these, proper cooling setup matters a lot, especially if you’re thinking about things like buying a new laptop where space is tight and airflow is limited.
So yeah, the main job here is simple. Stop overheating before it turns into thermal throttling and protection kicks in to slow the system down.
How a Heat Sink Works (The 4-Step Heat Path)
This one’s easier than it sounds. I like to break it into a simple flow. Heat doesn’t just disappear. It moves step by step from the CPU into the air.
1. Heat gets created (CPU load)
When your CPU runs apps or games, it creates heat. More load means more heat. That heat builds up fast on the chip surface, especially in demanding scenarios like modern gaming or when comparing setups such as console vs PC gaming where hardware load can vary a lot.
2. Heat moves into the heat sink (conduction)
Now the heat travels from the CPU into the heat sink base. This step uses conduction. Materials with high thermal conductivity, like copper or aluminum, move heat faster. Thermal paste helps here by filling tiny gaps so heat transfers better.
3. Heat spreads across the fins (distribution)
Once inside, the heat spreads through the heat sink. The fins increase surface area, so more heat can spread out instead of staying in one spot. This also depends on the temperature gradient. Heat always moves from hot to cooler areas.
4. Heat leaves into the air (convection)
Finally, heat moves into the air. This step uses convection. Air acts as the working fluid that carries heat away. A fan helps push air through the fins faster, which improves cooling.
According to Intel’s thermal management guidance, proper heat transfer and airflow keep processors within safe limits.
And one simple thing. A heat sink doesn’t destroy heat. It just moves it from the CPU into the air so it doesn’t build up.
A Simple Metric: Thermal Resistance (°C/W) Made Easy
This part sounds technical, but it’s actually simple. Thermal resistance shows how well a heat sink removes heat. It uses °C/W, which means how many degrees the temperature rises for each watt of heat. So yeah, lower thermal resistance means better cooling. You also look at delta T, which is the rise above ambient temperature, not just the final CPU temp.
Worked example:
95 W heat load × 0.25 °C/W = 23.75 °C rise above ambient
If your room is 25 °C, the heat sink adds about 23.75 °C on top of that
Standards published by JEDEC (JESD51) explain how thermal resistance gets measured under controlled conditions.
One thing though. This is just an example. Real results change based on airflow, mounting, and ambient temperature.
Types of Heat Sinks — Passive, Active, and Hybrid Options
Some people mix these up, but the type you pick really depends on airflow, noise, and how much thermal load your system creates.
Passive Heat Sinks (Fanless Cooling)
This type uses natural convection. No fan, no moving parts. Just heat moving into the air on its own.
- ✔️ Completely silent. No noise at all
- ✔️ Fewer parts, so less chance of failure
- ❌ Struggles with high thermal load
- ❌ Doesn’t work well in tight or low-airflow spaces
Best use: Low-power devices or open setups where air can move freely.
Active Heat Sinks (Forced Air with a Fan or Blower)
This is what most CPUs use. A fan or blower pushes air through the fins to remove heat faster. In high-performance setups that include multiple peripherals or custom hardware (like systems using mechanical key switches with background software), maintaining stable cooling becomes even more important.
- ✔️ Handles high thermal load easily
- ✔️ Strong airflow improves cooling performance
- ❌ Adds noise from the fan
- ❌ Fans can wear out over time
You’ll usually see axial fans in desktops and blower designs in smaller or closed systems.
Best use: Gaming PCs, workstations, and systems that run heavy tasks for long time.
Hybrid Heat Sinks (Adaptive Cooling)
This setup mixes passive cooling with a temperature-controlled fan. It stays quiet at low temps and turns active when needed.
- ✔️ Quiet during light use, powerful under load
- ✔️ Good balance between noise and performance
Best use: Systems with changing workloads, like daily PCs that switch between idle and gaming.
One quick tip I always tell people. More fins don’t always mean better cooling. High fin density needs strong airflow. Without enough air, heat just gets stuck instead of moving out.
Key Parts of a Heat Sink (and Why Each One Matters)
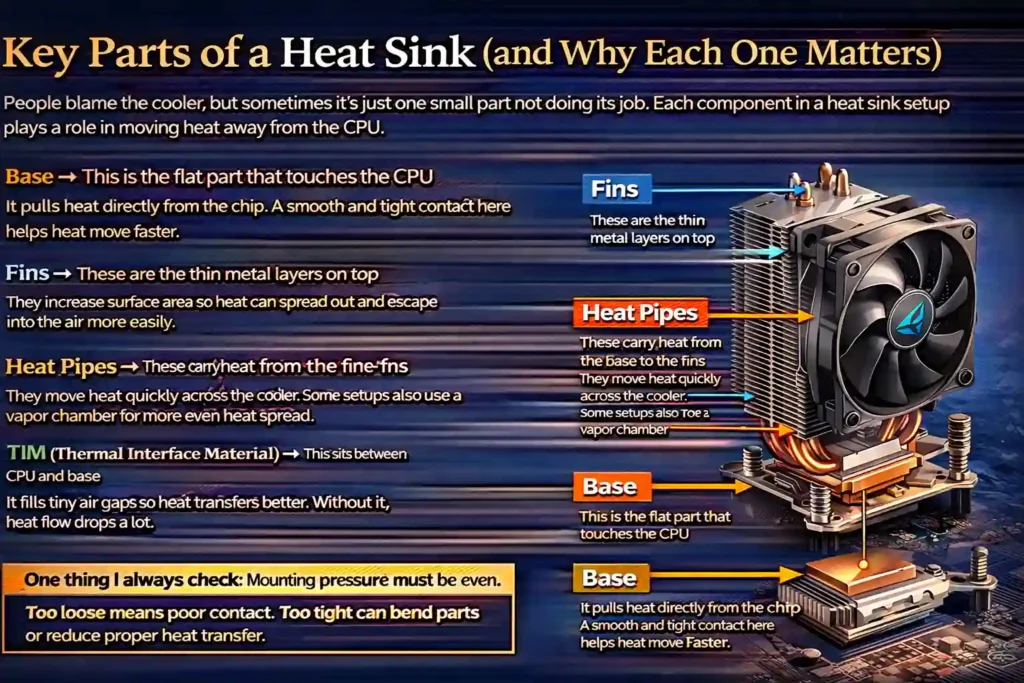
People blame the cooler, but sometimes it’s just one small part not doing its job. Each component in a heat sink setup plays a role in moving heat away from the CPU.
- Base → This is the flat part that touches the CPU
It pulls heat directly from the chip. A smooth and tight contact here helps heat move faster. - Fins → These are the thin metal layers on top
They increase surface area so heat can spread out and escape into the air more easily. - Heat Pipes → These carry heat from the base to the fins
They move heat quickly across the cooler. Some setups also use a vapor chamber for more even heat spread. - TIM (Thermal Interface Material) → This sits between CPU and base
It fills tiny air gaps so heat transfers better. Without it, heat flow drops a lot. - Mounting Hardware → This holds everything in place
You’ll see screws, push pins, or sometimes adhesive in smaller devices. Bigger coolers usually use screws for stronger hold.
One thing I always check. Mounting pressure must be even. Too loose means poor contact. Too tight can bend parts or reduce proper heat transfer.
Heat Sink Materials & Design Choices (What Really Affects Cooling)
People pick a cooler just by size, but material and design change how well it actually cools. Heat moves based on thermal conductivity, and the way fins are built also affects airflow and heat dissipation.
Material Comparison
| Material | Thermal Conductivity | What It Means |
| Copper heat sink | ~400 W/m·K | Moves heat faster, better for high heat loads |
| Aluminum heat sink | ~205 W/m·K | Lighter, cheaper, still good for most setups |
Data from Engineering ToolBox shows copper transfers heat almost 2x faster than aluminum.
So yeah, copper cools better, but it’s heavier and costs more. Aluminum is lighter and works fine for most users. That’s why many coolers mix both. Copper base + aluminum fins.
- Heat pipes / vapor chamber → These spread heat faster across the cooler
Good for high-performance CPUs or uneven heat loads
Choose this when:
- Aluminum → Budget builds, low to medium heat
- Copper → High heat systems, overclocking
- Heat pipes / vapor chamber → Strong cooling with better heat spread
Fin Density vs Airflow (Simple Rules That Actually Work)
This part trips people up.
- High fin density → Needs strong airflow to push air through
- Low fin spacing → Works better with natural convection or weak airflow
- More fins → More surface area, but only if air can move through them
Rule of thumb:
- Strong fan or blower → Dense fins work well
- Weak fan or passive cooling → Wider spacing is better
Common mistake:
I’ve seen dense fin coolers paired with weak fans. Looks powerful, but airflow can’t pass through. Heat gets stuck, and temps go up instead of down.
Thermal Paste / TIM: Types, How to Apply, and When to Replace It
I’ve seen temps stay high even with a good cooler, and most of the time it’s the TIM. Thermal paste, also called thermal interface material, fills tiny air gaps between the CPU and heat sink. Air blocks heat, so TIM helps heat move properly into the cooler.
Types of TIM (quick compare):
- Thermal paste → Most common
Easy to use, safe, works well for almost all CPUs - Thermal pad → Pre-shaped pad
Cleaner, but not as effective as paste in most cases - Liquid metal → Very high thermal conductivity
But it conducts electricity and can damage parts or void warranty
Honestly, for most people, regular thermal paste is the safest choice.
How to apply thermal paste (simple steps):
- Clean the CPU surface and cooler base
- Add a small amount of paste
- Place the cooler straight down
- Tighten evenly to spread the paste
For shape, I’d say:
- Small or square CPU → pea-dot works fine
- Bigger or rectangular CPU → line method spreads better
According to Noctua’s installation guides, proper mounting pressure helps spread paste evenly and improves contact.
When to reapply thermal paste:
Check or reapply every 1–3 years, or anytime you remove the cooler.
One quick warning. Liquid metal should not touch aluminum parts. It can react and damage the surface. For most setups, a non-conductive paste is the safer option.
Maintenance & Troubleshooting: Cleaning, Fan Issues, and Airflow Fixes
Temps go high, and people think the cooler is bad. But most of the time, it’s just dust or airflow problems. Poor cooling can also lead to deeper system instability issues over time, including crashes like CRITICAL_STRUCTURE_CORRUPTION if hardware starts behaving unpredictably.
Quick checklist (start here):
- Clean CPU cooler and fins every 3–6 months
- Remove dust from fans and case filters
- Check fan RPM in BIOS or software
- Listen for a noisy CPU fan (grinding sound = near failure)
- Make sure cables are not blocking airflow
If you have pets or a dusty room, clean more often. Dust builds fast.
Step-by-step troubleshooting (do in order):
- Check dust buildup
Dust blocks airflow and traps heat. Clean everything first. - Check fan speed (RPM / PWM)
If fan runs slow or not at all, check PWM settings or fan header connection. - Listen for noise
A noisy CPU fan usually means it’s wearing out. Replace it. Don’t try to fix it. - Check mounting and thermal paste
Bad contact or old paste can cause high temps. Reseat the cooler and reapply TIM. - Test airflow direction
Air should move from front to back or bottom to top. Wrong airflow orientation traps heat inside the case.
Easy airflow test (quick check):
Run your system under load with the side panel open for a few minutes. If temps drop fast, airflow inside the case is the problem.
Common symptoms → likely cause:
- High idle temps → bad paste or poor mounting
- High load temps → weak cooling or airflow issue
- Sudden temp spikes → fan failure or loose cooler
One more thing. Your setup also matters. Tight desk spaces or blocked sides can hurt airflow, especially in setups like a 3 monitor desk where space gets limited.
How to Test and Benchmark Your CPU Cooler (Tools, Workloads, and What Temps to Expect)
I’ve tested a lot of coolers, and guessing temps doesn’t work. You need a simple way to measure CPU temperature testing so you know if your cooling is actually doing its job.
Tools you can use:
- HWiNFO
- HWMonitor
- Core Temp
- Ryzen Master
Workloads to test:
- Prime95 or AIDA64 for full stress test CPU
- Cinebench for quick load test
- A real game for real-world temps
Simple 3-step test method:
- Check idle temps
Let your PC sit for a few minutes. Note idle vs load temps later. - Run a stress test (10–15 mins)
Use Prime95 or AIDA64. Watch temps closely.
If overclocked, run 30–60 mins for better results. - Compare with real use
Run Cinebench or a game. This shows how the cooler performs in daily use.
One thing I always do:
Check delta T, not just raw temps. That means how much your CPU temp rises above ambient temperature.
Example:
Room = 25°C
CPU = 70°C
Delta T = 45°C
This helps compare results across different rooms and seasons.
According to AMD developer guidance, thermal limits depend on CPU design, so safe temps can vary by model.
What results usually look like (general idea):
| Condition | What you may see |
| Idle | Low temps, stable |
| Load (stress test) | Higher temps, steady rise |
| Gaming | Medium temps, fluctuating |
When something feels off:
- Temps shoot up fast → bad mounting or no contact
- Temps stay too high → weak cooler or poor airflow
- System slows down → thermal throttling
Stop test if:
Temps rise too fast or system starts throttling. That usually means something is wrong. Check mounting, TIM, or airflow before running again.
Choosing the Right Heat Sink (Quick Buying Guide + Real Use Cases)
People buy a big cooler and still get bad temps. Size alone doesn’t decide cooling. You need to match the heat sink to your setup.
What to check before buying:
- TDP / thermal budget → How much heat your CPU produces
- Thermal resistance (°C/W) → Lower value means better cooling
- Clearance → Will it fit your case or laptop space
- Airflow → Strong or weak case airflow changes performance
- Environment → Open desktop, closed case, or rugged setup
Contact PSI Industries — Custom Heat Sink Solutions and Production
I’ve seen cases where off-the-shelf coolers just don’t fit. That’s where custom heat sinks come in. PSI Industries builds custom heat sinks using aluminum extrusion, designed around your exact needs. They typically produce and ship within two weeks, which helps when timelines are tight. Their process follows ISO 9001:2015 standards, so quality control and measurement stay consistent across production.
They also work with clear production limits. A 3” press requires a 50-pound minimum, while a 5.125” press requires a 150-pound minimum. So yeah, planning your order size matters. If you’re not sure what design you need, they can help. Just share details like power (W), ambient temperature, airflow, and space limits, and they can guide the design.
Request a quote to get pricing and timelines.
Contact us to discuss your custom heat sink requirements.
Conclusion
Most CPU cooling problems don’t come from bad hardware. They come from wrong setup. A good heat sink, proper thermal paste, and clean airflow solve most overheating issues. When heat moves out properly, your system stays stable and performs better. And yeah, even a strong cooler won’t help if airflow or mounting is wrong. That’s where troubleshooting and testing really matter.
FAQs
Do I always need a fan with a heat sink?
Not always. A passive heat sink works without a fan using natural airflow. But for most CPUs, an active heat sink with a fan handles higher heat better. If temps go high, add a fan or improve airflow.
Is copper always better than aluminum for heat sinks?
Copper moves heat faster than aluminum, so it cools better under high load. But it’s heavier and costs more. Aluminum works fine for most builds. If temps feel high, consider a copper base or better airflow.
How long does thermal paste last, and when should I reapply it?
Thermal paste lasts about 1–3 years. You should reapply thermal paste if you remove the cooler or notice higher temps. Old paste dries out and reduces heat transfer. If temps rise, clean and reapply TIM.
What’s the safest thermal paste method for beginners (pea vs line)?
I’d say the pea method works best for most CPUs. It spreads evenly when you mount the cooler. The line method works better for larger CPUs. If unsure, use a small pea dot and let pressure spread it.
Why are my CPU temps high even after installing a new cooler?
This usually comes from bad mounting, too much or too little thermal paste, or poor airflow. Even a good cooler fails if contact is weak. Reseat the cooler and check airflow inside the case.
How do I quickly test whether my cooler is working properly?
Run a stress test CPU for 10–15 minutes using tools like Prime95. Watch temps using HWiNFO. For deeper checks, test 30–60 minutes if overclocked. If temps spike fast, check mounting and airflow.
Can I use liquid metal instead of thermal paste?
Yes, but it’s risky. Liquid metal cools better, but it conducts electricity and can damage parts. It also reacts with aluminum. I’d only use it if you know what you’re doing. Otherwise, stick to normal paste.
What’s the difference between an axial fan and a blower cooler?
An axial fan pushes air down into the heat sink and spreads it around. A blower pushes air in one direction, usually out of the case. For tight spaces, blower works better. For open cases, axial fans perform well.