
How to Keep Your Gaming PC Clean for Best Performance
Last updated:
I’ve seen way too many friends ignore their dirty PCs, and trust me, it’s never a good idea. Dust buildup effects are real—it can slow your fans, make your PC overheat, and even cut down its lifespan. You really don’t want that.
Here’s what I do to keep my own clean gaming PC running smooth:
- Unplug First: Always unplug your PC before starting—don’t skip this step.
- Open It Up: Remove the side panel to access all the dusty areas.
- Blow It Out: Use compressed air to clean fans and tight spaces. Never use a regular vacuum.
- Brush It Off: A soft brush works great where air can’t reach.
- Clean Grates & Filters: Wipe down all the vents and filters—they get nasty fast.
Doing some basic PC cooling maintenance, like this, keeps your parts cooler and helps improve PC lifespan. I’d say cleaning your gaming computer every 3–6 months is usually good, but do it more often if you have pets or lots of dust around. Regular cleaning is easy, and your PC will thank you by running better, lasting longer, and avoiding heat-related issues like thermal throttling.
A Guide to Gaming PC Cleaning
Step 1: Prepare a Suitable Cleaning Area
When I get ready for a good cleaning area setup, I always look for a clean workspace—like a big table or cleared-off desk. Make sure you have enough dust blowing space, so you’re not just spreading dust around your room. Good ventilation really helps. If you’ve got an anti-static mat, use it for extra safety when you prepare PC cleaning. For a full walkthrough on safe cleaning practices, I also check guides like Replacing GPU Thermal Paste. Trust me, setting up right makes the whole job way easier and keeps things tidy.
Step 2: Power Off and Unplug Your PC Safely
Before I do any cleaning, I always shut down PC and unplug PC from the wall. Safety first—no shortcuts here! Flip the power switch at the back, too. That little extra step makes a big difference for PC power off safety. If you’re like me and have a bunch of wires, label them for easy setup later. And be gentle—yanking cables is just asking for trouble.
Here’s what you need to disconnect:
- Monitor
- Keyboard
- Speakers or headphones
- Ethernet cable
- Any USB devices
- Power cable

Take your time with disconnect cables, and your PC will stay safe and happy.
Step 3: Carefully Remove Your PC’s Side Panel
When it’s time to remove PC side panel, I always check what kind of case I have first. Most gaming PCs use PC case thumbscrews or regular screws at the back—just unscrew them by hand or with a small tool. If you’ve got a glass panel, be gentle and hold it with both hands, so it doesn’t slip. I like to keep all the PC case screws in a little bowl or cup so they don’t get lost. Always ground yourself before touching anything inside to avoid static. If you’re ever not sure about glass panel removal or your case style, a quick look at your manual can save you trouble.
Step 4: Carefully Vacuum Dust from Your PC’s Interior
If I notice a lot of dust inside, I’ll vacuum PC dust, but I’m super careful about those fragile PC components. Use a vacuum with an anti-static brush if you have one, and always use gentle, slow movements—don’t press hard or bump anything. For tough spots, I like to clean dust from PC with a blast of compressed air instead. Just remember, PC interior cleaning is all about being patient and safe so nothing gets damaged.
Step 5: Use Compressed Air to Remove Dust from Tight Spaces
Whenever I’m blowing dust from PC, I grab a can of compressed air for PC cleaning—nothing works better for cleaning crevices in a PC. I hold the can upright so no liquid sprays out, and use quick bursts, never long sprays. It’s best to do this outside or in a room with good airflow, so all that dust doesn’t just settle back down. Here’s my main tip for PC fan safety: always hold the fans in place with your finger before you use the air. If you let those spin freely, they can get damaged fast. After using compressed air, I’ll go back with a vacuum to clean up any dust that falls out. It’s easy, but go slow and be gentle—you want your PC parts safe and spotless.
Step 6: Remove and Clean PC Components Individually for Deep Cleaning
Sometimes just blasting your PC with air doesn’t cut it. If you see thick dust buildup, or your fans are still noisy after a quick clean, it might be time to remove PC components for a real deep cleaning. I only do this once or twice a year, but it makes a huge difference for cooling and keeping things running right. Always work slowly and place everything on an anti-static surface, like a wooden table, so nothing gets zapped.
Let’s start with the CPU cooler. I power off, unplug the PC, and then check the manual before touching anything. Carefully unscrew the cooler, and remember—don’t yank! After removing it, I clean CPU cooler fins and brush the fan blades with a soft brush. Dust hides deep in those heat sink cracks. If the old thermal paste looks dry or messy, I wipe it off with a bit of thermal paste remover and add a fresh layer before putting everything back. It really helps with heat.
For graphics card cleaning, I disconnect all the cables and unscrew it from the case. There’s usually a tab you push before the card comes loose—don’t force it. I hold the card by its edges and gently brush away dust, especially from the fan and heatsink. Be careful not to poke the parts inside. If your card is really dirty, compressed air helps a lot, but don’t let the fans spin like crazy while you clean.
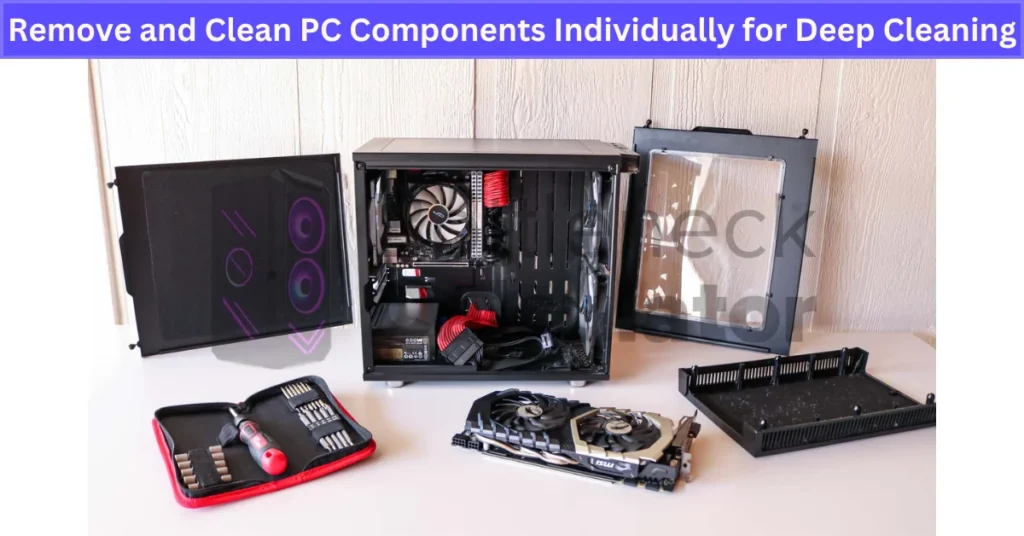
When it comes to hard drives or optical drives, unscrew them gently and slide them out. Wipe them down with a dry, soft cloth. Never spray anything wet on your drives. I always lay my drives on an anti-static surface to avoid static discharge. If you’re not sure how to take something out, looking up the manual or a video is a good idea. Taking it slow and being careful is the best way to keep your PC safe during cleaning.
Trust me, doing a proper thermal paste application and keeping everything dust-free can help your PC stay cool and last way longer. And if your GPU still runs hotter than you like after a full clean, learning how to adjust your graphics card fan speed can give you even more control over temp.
Step 7: Clean the Case Grates to Ensure Proper Airflow
I always notice how the case grates fill up with dust fast—they’re real dust magnets. To clean PC case grates right, I use compressed air for PC cleaning on the inside, blowing out the dust stuck in those tiny holes and grilles. On the outside, a feather duster or soft cloth works great for airflow dust cleaning. Don’t forget to check and clean any case fans or filters, too, since they catch a lot of dust. Before you reassemble PC components, make sure your cables aren’t blocking airflow. Put everything back slow and steady, and your PC will breathe much easier.
Step 8: Clean Your Peripherals for a Complete Refresh
When it comes to gaming PC maintenance, don’t forget the keyboard. I like to start with a quick upside-down shake—just give it a little tap and you’ll be shocked by what falls out. Then, I run a vacuum over the keys, pressing down each one so the nozzle can grab crumbs hiding underneath. For tough spots, a can of compressed air helps a lot. You’d be surprised how much a clean keyboard can change the whole feel.
The mouse is next. I wipe the buttons and body with a soft cloth dipped in a bit of rubbing alcohol. For those tiny spaces around the buttons, a toothpick works wonders. I always use a cotton swab or compressed air to gently clean around the lens underneath. Taking a minute for clean mouse care helps it move smoother and last longer.
Cleaning the monitor is pretty simple, but you have to be careful. I only use a microfiber cloth—no paper towels, because they scratch. Never spray cleaner straight onto the screen; instead, put a little on the cloth if you need to. A clean monitor just looks better, no streaks or smudges.
Once all your peripheral cleaning tips are done, plug everything back in. Double-check the cables, power up, and see how everything feels. Most times, after a good clean, the keyboard clicks better, the mouse glides easier, and your screen is way clearer. Regular cleaning helps stop dust buildup, keeps your gear working right, and really makes your whole setup feel fresh again. Sometimes, you’ll even notice lower temps or faster response—kind of a free performance boost!
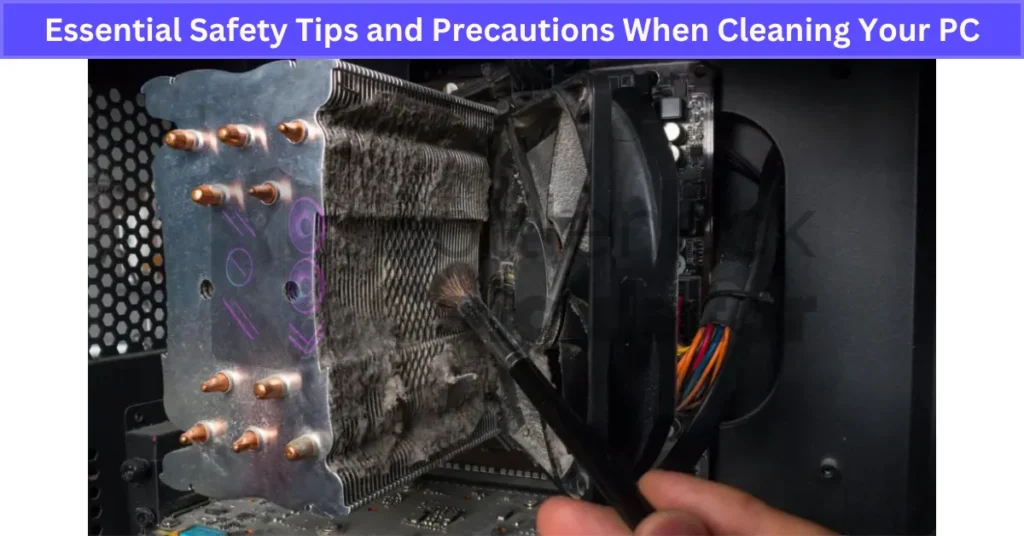
Essential Safety Tips and Precautions When Cleaning Your PC
PC cleaning safety is a big deal for me—messes can get expensive fast. Here’s how I keep things safe and smooth every single time:
- Unplug PC before cleaning. Always shut it down and switch off the power supply first. No power, no shocks, no accidents.
- Take anti-static precautions. Static can fry your parts. I use an anti-static wrist strap, but if you don’t have one, just touch a metal part of your case before you start. Using an anti-static mat on your table makes it even safer.
- Never use water or liquid cleaners near the inside of your PC. Even a tiny bit of liquid can cause damage or a short.
- Handle PC components safely. I’m extra gentle with fans, cables, and anything that feels wobbly or fragile. Never force anything out or in—wiggle it carefully.
- Use proper PC cleaning tools. I stick to compressed air, soft brushes, and microfiber cloths. A regular vacuum isn’t safe for inside the PC—static risk is too high.
- Work in a well-ventilated, clean area. Good airflow keeps you from breathing in dust and helps with dust blowing cleanup.
- Don’t blow compressed air too close to fans. Hold the fan blades in place with a finger so they don’t spin fast and break. Quick, short bursts of air work best.
- Keep cleaning supplies and tools away from pets or kids. Curious paws or hands and sharp PC parts just don’t mix.
- Never clean with the PC powered on. Sounds obvious, but you’d be surprised. Wait until it’s totally off and cool.
A little caution goes a long way. Taking these steps every time makes cleaning less scary, helps protect your gear, and just gives you peace of mind. Honestly, once you get the hang of safe cleaning, it’s way less stressful—and your gaming computer will thank you for it.
Deep Cleaning vs. Quick Maintenance: What’s Best for Your PC?
| What Is It? | Deep Cleaning PC | Quick PC Maintenance |
|---|---|---|
| How Often? | Every 3–6 months (or when temps are up, fans get loud) | Every month, or whenever you see surface dust |
| What You Do | Open case, unplug everything, remove and clean parts, use compressed air, soft brush, wipe fans and grates | Blow off dust from vents, grates, outside of case with compressed air, wipe down surface |
| Tools Needed | Screwdriver, compressed air, soft brush, anti-static mat | Compressed air, soft cloth |
| Skill Needed | Takes a bit of know-how (watch a video if unsure) | Super easy—anyone can do it |
| Why Do It? | Stops major dust buildup, helps cooling, boosts system performance, extends PC lifespan | Prevents dust buildup, keeps things running smooth between deep cleans |
| Signs You Need It | High temps, noisy fans, thick dust inside | Dust on case, airflow vents getting clogged |
Common Cleaning Mistakes to Avoid for Your Gaming PC
- Cleaning while your PC is on. Biggest gaming PC cleaning mistake out there. Always shut down, unplug, and disconnect everything first. I never mess with power and dust at the same time—just too risky.
- Spraying liquid directly onto parts. Using sprays or wet cloths right on your motherboard or GPU? Nope, that’s asking for trouble. If you need to clean, spray onto a cloth first, never on the components themselves. Liquids and electronics are a bad mix.
- Forgetting to ground yourself. I always make sure to touch a metal part of my case before I touch anything inside. That helps avoid PC static damage, which can kill your parts in seconds.
- Letting fans spin while using compressed air. This one’s easy to miss. When blowing dust, I hold the fan blades still with my finger. If you let them spin, they can get damaged or even send a jolt through your board.
- Using rough or abrasive cleaners. Scrubbing screens or delicate parts with paper towels or harsh pads can scratch them. I stick to microfiber cloths for safe PC cleaning tips.
- Rushing the job. I know cleaning isn’t the most fun, but hurrying can break stuff or miss hidden dust. Take it slow and go over every part.
- Skipping the cables. I always check and unplug every cable before cleaning. It’s easy to forget one, and you don’t want to yank something by mistake.
- Ignoring a regular schedule. Waiting until your PC is full of dust isn’t smart. I keep a checklist and set reminders to clean every few months. Makes the job way easier and helps avoid last-minute mistakes.
Honestly, cleaning gaming PC safely just comes down to being careful and patient. Stick to these tips, and your PC will stay safe, clean, and happy.
Software Cleanup and Optimization
How to Remove Unnecessary Files to Free Up Space on Windows
- I use Disk Cleanup Windows to remove unnecessary files. Just search “Disk Cleanup” in the Start menu, pick your drive, and scan. You’ll see options for deleting temp files, downloads, and stuff in the Recycle Bin.
- For deeper cleaning, I always click “Clean up system files” in Disk Cleanup. This finds even more old files, like past Windows updates and leftover installers. Takes a little longer, but it’s worth it to free up disk space.
- On Windows 10 and 11, I turn on Storage Sense in Settings > System > Storage. Storage Sense will automatically clean up temp files and things I haven’t used in a while. You can set how often it runs, which makes regular maintenance easy.
- Don’t forget to clear browsing history and cookies in your web browser settings. I do this every now and then, and it helps keep things running smooth while saving space.
- If you want to go the extra mile, you can schedule cleanups with Task Scheduler. That way, your PC stays tidy without you having to remember.
- I’ve tried third-party tools like CCleaner, but I’m always careful and only download from safe places. Sometimes they help, but built-in Windows tools work fine for most folks.
A little routine cleanup goes a long way. It keeps my PC happy and stops those “out of space” warnings from popping up!
How to Manage and Clean Up Installed Applications on Windows
When I want to manage installed apps, I go to Settings > Apps > Apps & features. This shows me every program on my PC. I scroll through the list and check what I don’t use anymore.
Here are the types of apps I usually remove:
- Old programs I never open
- Duplicate tools doing the same thing
- Free trials that already expired
- Pre-installed bloatware that just sits there
- Big games or software I finished and won’t need again
Before I uninstall programs Windows thinks are important, I make a system restore point. That way, if something goes wrong, I can get my setup back fast. Sometimes, I check app permissions too—lots of apps run in the background without me knowing.
I also like to disable startup apps for a quicker boot. I just right-click the taskbar, open Task Manager, and go to the Startup tab. There, I turn off anything I don’t need starting up every time my PC turns on.
For extra help, I use Microsoft PC Manager or even third-party tools like CCleaner software. These can give cleanup tips, safely uninstall stubborn apps, and even tidy up leftover files or registry entries. I just make sure to download tools from safe, official websites. Keeping your apps tidy makes Windows run smoother and frees up space for the stuff you really want.
How to Keep Your System Updated and Protected
Keeping up with system updates is one of those things I never ignore. Windows Update is what keeps my PC safe and running right—new features, bug fixes, and security patches all come through there. To check for updates, I go to Settings > Update & Security > Windows Update and click “Check for updates.” I like to keep automatic updates turned on so I don’t forget. It’s also smart to check your firewall every now and then, just to make sure nothing weird is getting through.
For malware protection, I rely on Windows Defender. It runs in the background and catches most threats. I run regular scans and always let Defender update itself with the newest virus definitions. If anything pops up, I deal with it right away so it doesn’t spread. Sometimes, if my PC feels off, I’ll use a second malware scanner for peace of mind.
When things start feeling slow, I reach for PC optimization tools. These one-click apps clean up junk files, repair little errors, and can make my computer feel brand new. Microsoft PC Manager and CCleaner are both options, but I only download from official sites—fake tools are bad news.
Finally, I count on automatic maintenance. Windows does a lot of background cleanup by itself—removing temp files, checking the hard drive, and more, usually while I’m not even using the PC. I set these tasks to run on a schedule, so everything stays updated and protected without me having to remember. Regular care is the best way to keep my computer safe and smooth.
Final Verdict
Honestly, keeping your gaming PC clean isn’t hard, and it pays off big time. A little dust cleaning, some smart software cleanup, and staying on top of updates really helps your PC run better and last longer. I’ve seen old, dirty PCs slow down or even die early, just from people ignoring the basics.
If you make regular cleaning and simple checks a habit—inside and out—your PC stays happy, cool, and speedy. It doesn’t take fancy tools or a bunch of tech knowledge. Just stick to these steps, watch out for common mistakes, and use Windows’ built-in tools. Trust me, your games will load faster and your computer will thank you for it.
FAQ’s
How can I clean up my PC to run faster?
Uninstall bloatware you never use.
Update drivers so everything runs smooth.
Turn off apps and services you don’t need at startup.
Delete old Windows update files to free up space.
What is the best way to wipe a PC?
Open Settings, then go to Update & Security > Recovery.
Under “Reset this PC,” click Get started.
Pick Remove everything.
Choose Remove files and clean the drive for a real secure wipe.
Just follow the steps on your screen to finish.
How to air dust on a PC?
First, take off the side panel so you can get inside your PC. Grab a can of compressed air, hold it upright, and use short bursts to blow out the dust. Start at the top and work your way down. Don’t forget to clean the cooling fans, heat sinks, and vents.
Is it safe to air dust a PC?
Yeah, it’s safe—as long as your PC is turned off first. Always keep the can of compressed air upright while you spray. That way, you won’t get any moisture in your PC, and dust comes out clean.
Does dust ruin a PC?
Honestly, yeah—dust can mess up a PC pretty fast. If you let it build up, dust blocks airflow and makes your computer run hotter. That heat can slow down your PC, cause weird crashes, and even damage the parts inside over time. Keeping it clean really matters.
What to clean a PC with?
Wipe the case with a soft, damp microfiber cloth.
Use compressed air to blow dust out of vents and ports.
Pay attention to dust filters—they collect a lot.
Clean the fan grills so your PC gets good airflow.
How to speed up a PC?
Update Windows and your drivers so everything’s fresh.
Restart your PC and only open apps you actually need.
Turn on ReadyBoost if you have a USB drive—it helps memory.
Make sure Windows is handling the page file size for you.
Free up disk space when things get low.
Can I clean my computer with water?
Nope, never use water or liquid cleaners right on your computer parts. It can wreck your PC fast.
Can I use a hair dryer to clean my PC?
No way—don’t use a hair dryer or vacuum cleaner for cleaning PC parts. They can make static that might fry the electronics inside. Stick with compressed air or a soft brush instead.