
Fix CRITICAL_STRUCTURE_CORRUPTION (Bug Check 0x109) on Windows 10
I’ve seen this BSOD pop up a lot. The CRITICAL_STRUCTURE_CORRUPTION error shows as a Blue Screen of Death on Windows 10 with stop code bug check 0x109. It usually comes from a bad driver or faulty RAM, but you can track it step by step. And yeah, it can happen whether your PC still boots or not, even in Safe Mode cases. According to Microsoft’s Bug Check 0x109 docs, this means critical kernel data gets corrupted and needs driver or hardware checks.
Key Takeaways You Should Know
- Most cases of CRITICAL_STRUCTURE_CORRUPTION come from bad drivers or faulty hardware like RAM or storage.
- Always grab proof first. Check minidumps and Event Viewer timestamps before touching drivers or reinstalling Windows.
- If the PC won’t boot, force recovery. Turn it on and off 3 times to enter Safe Mode.
- Start simple fixes first:
- Remove problem apps
- Update or roll back drivers
- Do a clean boot
- Test RAM
- You can use WinDbg to find the exact .sys driver, then confirm it with Driver Verifier. Careful here, don’t rush it.
- If the system still crashes outside Windows using a Linux live USB, hardware is likely the issue.
- When it looks like hardware, save SMART data, memtest results, and dump files. Then contact warranty or go for RMA instead of wiping everything.
What CRITICAL_STRUCTURE_CORRUPTION (0x109) Really Means and Why It Happens
People get confused by this one. Bug Check 0x109 means Windows found damage in a critical structure inside kernel code or kernel data. That’s deep system stuff. When it breaks, Windows stops everything to prevent more damage. According to Microsoft, this bugcheck points to corruption in core system memory, and the crash dump usually shows the driver or module behind it. You can check the official details here:
Main cause buckets:
- Driver issues: A bad or outdated driver modifies kernel code or kernel data and breaks system stability
- Corrupted hardware: Faulty RAM or storage sends bad data, which leads to critical structure corruption. In some cases, overheating hardware can also cause instability, so it helps to understand how cooling components like a heat sink manage heat inside your system.
Before You Change Anything: Capture Quick Evidence (5–10 Minutes)
People jump straight to fixes and make things worse. I’d say pause and grab some proof first. These BSOD errors leave clues like minidump files, stop code details, and timestamps. That info helps you fix the right thing instead of guessing.
Collect minidumps (and optional full dump)
- Open File Explorer
- Paste this path: C:\Windows\minidump
- Copy the latest .dmp file
- Zip it before sharing
You might also see a bigger file called MEMORY.DMP in C:\Windows. That one stores full crash data.
Optional quick command:
dir /a /o:-d C:\Windows\Minidump
Record what the BSOD shows
- Note the stop code and exact timestamp
- Check if a file shows up like ndis.sys
ndis.sys points to network drivers, so I’d check Wi Fi or LAN drivers first.
Also run winver and note your Windows version. It helps match driver issues.
⚠️ One small tip. Share only zipped dump files. Don’t upload personal files by mistake.
If You Can’t Log In: Start Safe Mode Using Windows Recovery
I’ve hit this situation before. The system keeps crashing before login. That’s where Safe Mode helps. It loads only basic drivers, so you can remove bad apps or drivers that cause the BSOD. You can open it using Windows Recovery, also called WinRE.
Steps to enter Safe Mode:
- Turn on your PC
- As soon as Windows starts loading, hold the power button to shut it off
- Do this power on and off 3 times
- On the third try, Windows opens Windows Recovery (WinRE)
- Go to: Troubleshoot → Advanced options → Startup Settings → Restart
- Press 4 or F4 to start Safe Mode
Once inside Safe Mode, you can uninstall drivers or apps that crash normal boot.
Troubleshooting Flow: Driver First or Hardware First
This part matters a lot. Some people blame hardware too fast. But sometimes it’s just a bad driver. So I usually follow a simple decision flow based on real evidence.
Quick decision steps:
- If your minidump or Event Viewer shows a clear driver file name like .sys
→ Start with drivers first - If crashes happen randomly with no clear file
→ Check for possible hardware fault - If you see RAM errors in tests
→ Focus on memory - If storage tools show bad sectors or warnings
→ Check SMART data and disk health
Simple check table:
| Evidence | What to do next |
| Driver name in minidump | Update or roll back that driver |
| Event Viewer shows same file repeatedly | Focus on that device driver |
| No clear pattern | Test RAM and storage |
| SMART warnings or errors | Replace or check drive |
Common mistakes I see:
- Thinking the shown driver is always the real cause
- Running Driver Verifier on all drivers at once
- Skipping Event Viewer and guessing
Always follow the data first. It saves a lot of time.
Try These Fixes in Order (Stop When the BSOD Is Gone)
I usually go step by step here. Don’t try everything at once. Test after each fix. If the system crashes before login, use Safe Mode by doing power on and off 3 times.
Follow this order:
- Uninstall recently added or known problem apps
- Run SFC and DISM to repair system files
- Update or roll back drivers (start with GPU and network)
- Perform a clean boot to remove software conflicts
- Test RAM using memory tools
- Check Event Viewer and minidump clues
- Use advanced tools like WinDbg and Driver Verifier if needed
Graphics drivers are a common cause of crashes, especially on systems handling higher display loads or multiple screens. If you’re using a setup like a 3 monitor desk, even small driver issues or cable problems can lead to instability, so keeping GPU drivers updated is critical.
⚠️ Safety tip:
Create a system restore point and back up important files before changing drivers or uninstalling anything.
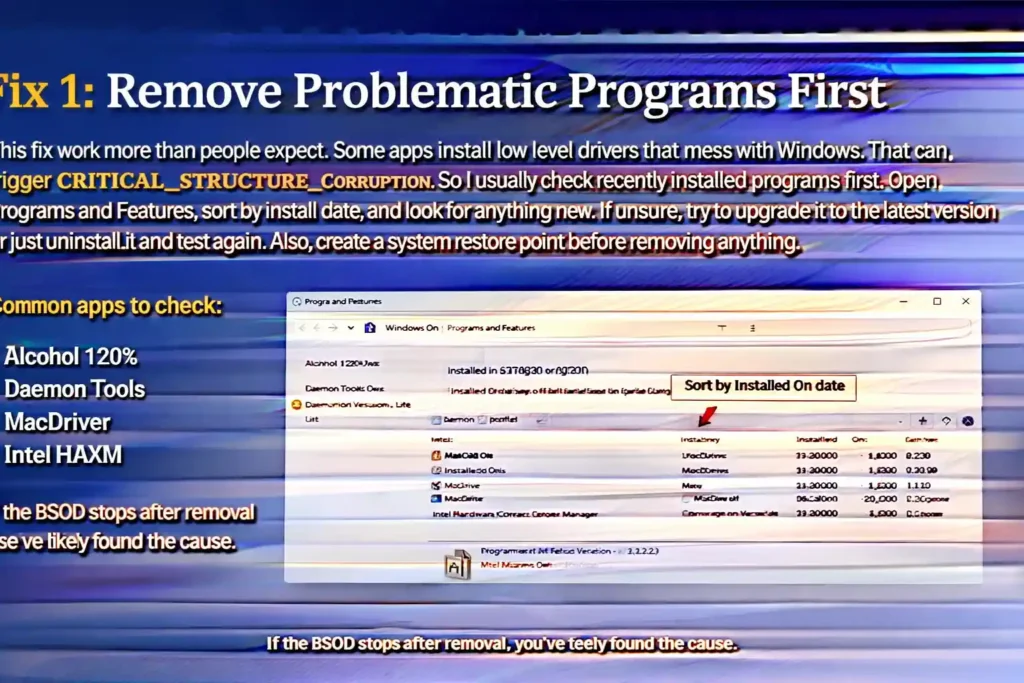
Fix 1: Remove Problematic Programs First
This fix work more than people expect. Some apps install low level drivers that mess with Windows. That can trigger CRITICAL_STRUCTURE_CORRUPTION. So I usually check recently installed programs first. Open Programs and Features, sort by install date, and look for anything new. If unsure, try to upgrade it to the latest version or just uninstall and test again. Also, create a system restore point before removing anything.
Common apps to check:
- Alcohol 120%
- Daemon Tools
- MacDriver
- Intel HAXM
If the BSOD stops after removal, you’ve likely found the cause.
Fix 2: Repair Windows Files Using SFC and DISM
I’ve seen crashes happen just because system files get damaged. Windows relies on these files to run properly. If they break, you get random BSODs like this one. So I usually run System File Checker first, then DISM if needed.
👉 Run this in an elevated Command Prompt (right click → Run as administrator)
Step 1: Scan and fix system files
sfc /scannow
This checks Windows files and repairs what it can.
Step 2: If issues remain, repair the Windows image
DISM /Online /Cleanup-Image /RestoreHealth
DISM fixes deeper problems inside the Windows image that SFC can’t handle.
After DISM finishes, I run sfc /scannow again. That second pass often cleans up remaining errors.
Fix 3: Update or Roll Back Drivers (Start With GPU and Network)
This fix solve a lot of BSOD cases. Drivers control how hardware talks to Windows. If a graphics driver or network adapter driver breaks, it can corrupt system memory and crash the system. So I always check drivers early.
👉 Before you change anything:
- Create a restore point
- Open Device Manager → Properties → Driver
- Note the current driver version
Update Graphics (Video) Driver From the Manufacturer
Your video card driver is a common cause. I usually start here.
Steps:
- Open Device Manager
- Expand Display adapters
- Right click your GPU → Properties → Driver tab
- Check current version
- Download latest driver from NVIDIA, AMD, or Intel
- Install and restart
If the issue started after a recent update, rolling back might work better.
If BSOD Mentions ndis.sys, Focus on Network Drivers
ndis.sys show up a lot. That points to network issues.
Steps:
- Open Device Manager
- Expand Network adapters
- Update Wi Fi or LAN driver from your laptop or motherboard support page
- Restart system
Optional quick test. Disable the network adapter and see if crashes stop. If yes, the driver is likely the problem.
Rollback tips (if things get worse):
- Go to Device Manager → Driver tab
- Click “Roll Back Driver”
- Restart and test again
If driver problems keep coming back, it could be aging hardware. At that point, upgrading might make more sense than fixing again and again. If you’re unsure what specs to choose, this guide on buying a new laptop can help you avoid common mistakes and pick the right system.
Fix 4: Do a Clean Boot to Find Software Conflicts
Random apps cause crashes without warning. Sometimes even low-level input tools or drivers tied to hardware (like custom keyboard software or mechanical key switches) can interfere with system stability, especially if they install background services. A clean boot helps you start Windows with only basic services. That way, you can see if some background app is breaking things.
Follow these steps:
- Press Win + R
- Type msconfig and press Enter
- Open System Configuration
- Go to the Services tab
- Check Hide all Microsoft services
- Click Disable all
- Go to the Startup tab
- Click Open Task Manager
- In Task Manager, disable all startup items
- Close Task Manager
- Click OK in System Configuration
- Restart your PC
Now your system runs in a clean state.
Taking a screenshot before disabling anything. It helps you restore things later.
After restart, use your PC normally. If the BSOD stops, then one of those disabled apps is the problem.
Now comes the testing part. Re enable services and startup items one by one. Restart each time and check. Yeah, it takes time. But this is the easiest way to find the exact app causing the issue.
Fix 5: Test Your RAM (Windows Memory Diagnostic + MemTest86 Option)
Faulty RAM cause this exact crash. Bad memory sends wrong data to the system, and that leads to corruption. So yeah, checking RAM is a must.
Step 1: Use Windows Memory Diagnostic
- Press Win + R
- Type mdsched.exe and press Enter
- Click Restart now and check for problems
- Your PC will reboot and start testing RAM
- Wait for the test to complete
Windows will show results after restart. If you miss it, check Event Viewer.
Step 2: Try MemTest86 for deeper testing
If you want more accurate results, I’d go with MemTest86. It runs outside Windows and does better checks.
👉 You can follow the official guide here:
Important tip: Test one RAM stick at a time
If errors show up, don’t guess. Remove one RAM stick, test again, then switch. This helps find the bad module.
And yeah, if you’re not comfortable opening your PC, better ask a technician.
Fix 6: Check Event Viewer for Clues (Driver Names, Event IDs, Timing)
I use Event Viewer a lot. It shows what happened right before the crash. You can often spot a driver filename or a BugCheck entry with useful details.
Steps to check logs:
- Press Win + X → open Event Viewer
- Go to Windows Logs → System
- Look for errors around the crash time
- Open entries with Event ID like BugCheck
Common driver clues:
| Driver file | What it relates to |
| nvlddmkm.sys | NVIDIA graphics driver |
| igdkmd64.sys | Intel graphics driver |
| ndis.sys | Network adapter |
One thing though. The named driver is not always the real cause. Sometimes it’s just the one that crashed last. So always confirm with minidump files too.
What to copy for analysis:
- Event ID, Source, and exact timestamp
- Driver filename shown in the error
This small data helps find the real problem faster.
Analyze Crash Dumps and Use Driver Verifier (WinDbg Walkthrough)
This is where things get real. I’ve found the exact cause many times using dump files. Windows saves crash data in minidump or full dump files like MEMORY.DMP. You just need the right tool.
Step 1: Find dump files
- Go to C:\Windows\Minidump
- Or check MEMORY.DMP in C:\Windows
Step 2: Open dumps in WinDbg
- Install WinDbg
- Open the dump file
Set symbols (very important):
.symfix; .symfix+; .reload
Without symbols, results can look confusing.
Step 3: Run basic analysis commands
!analyze -v
Shows the full bugcheck report and possible cause
lmvm <driver>
Displays details about a specific driver
!irp
Shows I/O request info (useful in some driver cases)
Example output snippet:
BugCheck 109, {param1, param2, param3, param4}
Probably caused by : nvlddmkm.sys
STACK_TEXT:
fffff800`12345678 …
Here you look for the driver name and STACK_TEXT. That’s your main clue.
Use Driver Verifier (Carefully)
Driver Verifier can crash your system on purpose to expose bad drivers.
Safe checklist:
- Enable it for one suspect driver at a time
- Don’t select all drivers
- Restart and test
If your PC gets stuck in a boot loop:
- Enter WinRE
- Open Command Prompt
- Run:
verifier /reset
That turns it off.
Use a Linux Live USB to Check Hardware vs Windows (and Rescue Data)
This trick when nothing makes sense. If your system crashes only in Windows, it could be drivers. But if it crashes even outside Windows, then yeah, hardware is likely the problem. A Linux live USB helps you test that without touching your files.
What you need:
- A USB drive
- Ubuntu ISO file (~2GB+)
👉 Create a bootable USB using this guide.
Steps to test:
- Plug in the USB and boot into it
- Choose “Try Ubuntu” (no install)
- Use the system normally for a while
If it runs stable, Windows drivers are likely the issue. If it still crashes, I’d suspect hardware.
Check disk health (SMART report):
sudo smartctl -a /dev/sdX
This shows disk status and errors.
👉 Learn more:
Optional deeper disk scan:
sudo badblocks -sv /dev/sdX
⚠️ Careful. Some modes of badblocks can damage data. Use read only checks unless you know what you’re doing.
Data rescue tip:
If your drive looks unstable, don’t risk it. Use a read-only mount to avoid more damage. Then copy files using the file manager or rsync.
Extra note:
You can also use tools like GParted to inspect partitions. If errors show up here too, that’s a strong sign of hardware failure.
What to Collect Before RMA or Professional Repair
People send devices for repair with no proof. That slows everything down. If you collect the right data, support can act faster and you avoid back and forth emails.
What to gather first:
- Latest minidump ZIP files from C:\Windows\Minidump
- Key details from Event Viewer (Event ID, Source, timestamp)
- Your Windows version using winver
- BIOS/UEFI version
- Results from RAM tests and notes if errors appeared
- SMART report from your drive
- Check values like Reallocated_Sector_Count
- Device serial number and model info
- Short note of what you already tried
Simple RMA / support message template:
“Hi, I’m facing repeated BSOD with CRITICAL_STRUCTURE_CORRUPTION (bug check 0x109).
Steps to reproduce:
- Happens during normal use / gaming / startup. If you mainly face crashes while gaming, it’s also worth understanding how your setup compares, especially differences between console vs PC gaming — since hardware load and optimization can vary a lot.
What I tested:
- Updated and rolled back drivers
- Ran memory tests
- Checked system logs
Results:
- Errors still occur
Attached files:
- Minidump ZIP
- Event Viewer logs
- SMART report
System info:
- Windows version:
- BIOS/UEFI version:
- Device serial number:
Please advise next steps or RMA process.”
Last Option: Refresh, Reset, or Reinstall Windows 10
I only go here when nothing else works. This step wipes system issues, but you lose useful clues. So first, collect your minidumps and logs. After reinstall, that data is gone. Also make a full backup and keep your license info safe.
Your options:
- Reset (keep files): Reinstalls Windows 10 but keeps personal files. Good for quick recovery
- Clean reinstall: Full wipe and fresh install. Best if problems keep coming back
I’d try reset first. If crashes still happen, then go for a clean reinstall.
Conclusion
I’ve seen this error look scary, but it’s usually fixable if you follow the right order. Start with evidence first. Check minidump files and Event Viewer, then move step by step. If you find a driver name, follow the driver route and test with Driver Verifier. If tests show RAM errors or bad SMART data, then it’s likely hardware. At that point, go for repair or RMA instead of guessing. And yeah, when asking for help, always share your latest dump files and Event Viewer details so others can give real answers.
FAQs
What usually causes CRITICAL_STRUCTURE_CORRUPTION on Windows 10?
I’ve seen this come from a few main things. A bad driver can change kernel data and break the system. Faulty RAM or storage can send wrong data, which leads to crashes. Sometimes damaged system files also play a role. In most cases, bug check 0x109 points to either driver issues or hardware problems inside the kernel.
If my BSOD mentions ndis.sys, what should I do first?
Update your network adapter driver from the OEM site
If the issue started after an update, roll back the driver
Test both Wi Fi driver and Ethernet driver
Restart and check if the crash stops
Where are Windows minidump files located, and what should I share?
You’ll find minidump files here: C:\Windows\minidump.
I usually zip the latest .dmp file before sharing. Also include the crash time and matching Event Viewer logs so others can understand what happened.
Is Driver Verifier safe, and how do I turn it off if Windows won’t boot?
It’s useful, but I’d be careful. Only enable Driver Verifier for one suspect driver. Running it on all drivers can cause boot loops. If your system won’t start, go to WinRE, open Command Prompt, and run verifier /reset to disable it.
Should I update BIOS or UEFI for this error?
Maybe. If your OEM mentions stability or firmware fixes, then yes, it can help. But don’t rush it. BIOS or UEFI updates carry some risk. Follow official steps and never interrupt the update. If your system is stable otherwise, I’d leave it.
How do I know if it’s hardware if Windows keeps crashing?
RAM test shows errors using tools like MemTest86
Disk shows warnings in SMART or via smartctl
System crashes even on a Linux live USB
Crashes get more frequent over time
These signs usually point to hardware failure.
When should I stop troubleshooting and consider replacing the PC?
I’d say stop when hardware keeps failing again and again. If repair cost is high or no warranty is left, replacement makes more sense. Also, if your data is at risk, don’t wait too long.